Well today I thought might like to join me in a little experiment.
The beauty of the internet means that I have a constant source of inspiration available so there are always new ideas to try out; today I’m working on producing bead caps in metal clay and I’ll be sharing with you how it goes over the next two blogs.
I should probably mention at his point that I can’t draw, at all, for some reason I simply cannot convey what I see in my mind onto paper in any way that is recognisable or even useful so I just skip over that part, dive into the making process and make lots of notes. So there will be no sketches or concepts for you to see at the start of a project, I will do my best to explain what I’m trying to achieve and hopefully imagination will supply the rest.

Because clay starts to dry the
minute it encounters air I like to have everything laid out close to hand
before I start and as you can see from the picture you really don’t need much
in the way of tools. First of all let’s talk about the clay I’m going to use; Hadar’s Clay ™ Quick Fire Copper, this
comes in a powdered form so I can just mix up what I need for that day, the
rest will keep almost indefinitely in the plastic jar (the beauty of this
product is there is virtually no waste, if you make a mistake just dry the clay
out thoroughly, grind it back to powder and start again).

The trick with mixing up the clay
is to add just enough water for it to start to bind but still feel reasonably
dry to the touch – a bit like making pastry really – the clay will actually
come together nicely when you roll it out.
You’ll notice that I use a
plastic wallet for rolling out the clay, I originally started doing this
because I have four cats and no matter how much you clean and hoover clay is a
magnet for pet hairs! I roll the mixed clay a couple of times to make sure it’s
thoroughly mixed and then roll it to the required depth (playing cards are
great for this I have pairs of them taped together in 2, 3, 4, 5, and 6 deep). For the first set of caps I have simply
transferred the rolled clay onto a hard surface and used the cutter to give me
the shape I want. If you want to make caps for beads then you may as well use
beads as a drying form, in this case some rather nice large japer ones. I’ve used
a knitting needle to lightly press channel in between each petal tip for a
little interest, the shape can be finalised when they are dry.

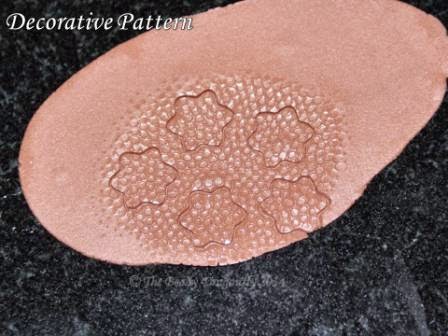
For the second set I’m going to
press a decorative plate into the surface of the clay, I’ve used quite a shallow
pattern as the pieces are so small so it will be interesting to see the effect
when it is fired. It can be quite a fiddly job lifting and piercing the caps
then easing them into shape on the bead so I like to cove the clay with a damp
piece of kitchen towel to stop it drying out while I work.
Next stop is tidying up the edges and sanding
the surfaces, it’s a lot easier to shape and sand clay so do as much of the
finishing as you can at this stage. Dried clay is brittle and will snap but
with a little care you can do some really fine detail work on it, use water and
clay slip to fill and smooth any cracks in the work. The really important thing now is to ensure
that the piece is completely dry; any moisture in the clay when firing will
nearly always end in disaster causing cracks and breakages. Pop the pieces onto
a clean piece of glass or mirror for a few minutes, if there is any misting on
the glass there is still moisture in the pieces. I have a warming plate that I
use because I need to dry a number of pieces as quickly as possible, that said,
it is on the lowest setting with the pieces on a rack about eight inches above
it. It’s the warm air circulating it not the direct heat that dries the piece
safely.

Well that’s about it for the
first part – next up Firing and Finishing.
No comments:
Post a Comment