Monday 30 March 2015
Friday 2 January 2015
Thinking of going Self Employed? It's all in the planning!
If you are an active member of a
networking group at some point somebody will ask the inevitable question; “I
want to give up my full time job and run my own business but I don’t know where
to start – does anybody have any advice?” I, along with many others, have
always tried to help, giving what advice we can based on our own experiences.
In an effort to help anyone considering following me down the path of self employment
this is how my journey started along with a few suggestions that I think are important.

I wasn’t one of those people who
hated their job; it was hard work and stressful but also challenging
and fulfilling at the same time and I’ve worked in a lot worse places. For me
it was a nagging sense of missing out on something and for a long time I
couldn’t pinpoint exactly what. In the early hours of a sleepless night after a
truly dreadful day at work I made a decision; I was worth more than this, to be
a cog that gets used up, worn out and spat into oblivion, just another statistic
with a long list of ‘what if’s’ and so the seed was planted.
Now I’m a planner – whether it’s
planting a flower bed, decorating a room or setting up a business the first
thing I do is reach for a pen and paper.
I know this isn’t everybody’s way but seriously this is the one thing
you really have to get used to doing, it will save a lot of effort, frustration
and heartache in the long run.
The first thing I did was sit
down and have a long talk with my husband, any decision I took would have a
massive impact on him – essentially we were going from a two wage family to a
single wage one. He might not be the world’s most romantic person but he’s very
calm and level headed and he just told me to go away and get some ideas
together and we’d take it from there and the rest is history as they say!
For me these points were
essential, others may be in different circumstance and they may not apply but
the aim of this blog is to help people get started with their own planning.
v This
is going to take time – there are an awful lot of things you have to put in
place before you start out, these steps really are essential, trust me you will
have so many new things hitting you when you first start out you simply won’t have time to set up as you
go along.
v Look
at your personal finances – get your bank statements for at least the last six
months out and go through them, write down what you spend your money on, divide
it into essential and non essential categories.
The essential list is your bottom line, non negotiable, somebody will
have to pay those every month. When I
first looked at mine I wasn’t in a position where I could give up my job and my
husband could cover my outgoings. So I stopped buying all those non essential
bits and pieces every month and started getting rid of things on my essentials
list. Store cards, credit cards,
magazine subscriptions, if I couldn’t pay them off completely I got the
balances down to where we could afford the monthly payments.
v You
will need a dedicated place to work, time is money in this game, if you can’t
have all of your equipment and supplies out or readily to hand or you will lose
a lot of valuable time packing and unpacking every day. You will also need to
make sure your family understand that this area is a ‘no go’ area: no dumping
of toys, no hijacking the computer to surf YouTube and absolutely no
‘borrowing’ of anything (My husband is a devil for borrowing my tools and not
putting them back).
v Talking
of family you will need to set some ground rules with them. I am not for one
minute suggesting that you totally ignore your family during ‘working hours’
but they are used to having Mum/Dad available whenever they want them. This was
one of the hardest things for me, making them understand that despite the fact
that I was sat at a workbench upstairs it
didn’t mean they could wander in at any given time for a little chat or
that I could come down and do ‘X’ ‘Y’ or ‘Z’ Now – Immediately!
v Most
people struggle to get meaningful sales for the first 3, 6, 12 months when they
set up – it takes time to build up a brand and you will spend many a day
thinking you are talking to yourself. So you need to plan (that word again) for
this, make sure you have all the equipment and materials you need to stockpile
products for sale when you set up – don’t get into that vicious circle where
you need money to produce a product but you have no product to sell to produce
money.
v Branding
is so, so important - it is your visual name and signature. It doesn’t need to
be complicated (or expensive) it just needs to be something that makes people
think of you when they see it. Go and visit all of the those lovely websites
that you like – why do you like them?, What is it that makes you want to look
at their products? This isn’t about what they are selling but about ‘HOW’ they
are selling it, it’s a great free resource so make the most of it. Find something you like and use
it to build your business.

I’m sure that there
are many other things that you need to consider but I hope that this post gives
you something to start with.
Sunday 26 October 2014
Experimenting With Copper Clay
Well today I thought might like to join me in a little experiment.
The beauty of the internet means that I have a constant source of inspiration available so there are always new ideas to try out; today I’m working on producing bead caps in metal clay and I’ll be sharing with you how it goes over the next two blogs.
I should probably mention at his point that I can’t draw, at all, for some reason I simply cannot convey what I see in my mind onto paper in any way that is recognisable or even useful so I just skip over that part, dive into the making process and make lots of notes. So there will be no sketches or concepts for you to see at the start of a project, I will do my best to explain what I’m trying to achieve and hopefully imagination will supply the rest.

Because clay starts to dry the
minute it encounters air I like to have everything laid out close to hand
before I start and as you can see from the picture you really don’t need much
in the way of tools. First of all let’s talk about the clay I’m going to use; Hadar’s Clay ™ Quick Fire Copper, this
comes in a powdered form so I can just mix up what I need for that day, the
rest will keep almost indefinitely in the plastic jar (the beauty of this
product is there is virtually no waste, if you make a mistake just dry the clay
out thoroughly, grind it back to powder and start again).

The trick with mixing up the clay
is to add just enough water for it to start to bind but still feel reasonably
dry to the touch – a bit like making pastry really – the clay will actually
come together nicely when you roll it out.
You’ll notice that I use a
plastic wallet for rolling out the clay, I originally started doing this
because I have four cats and no matter how much you clean and hoover clay is a
magnet for pet hairs! I roll the mixed clay a couple of times to make sure it’s
thoroughly mixed and then roll it to the required depth (playing cards are
great for this I have pairs of them taped together in 2, 3, 4, 5, and 6 deep). For the first set of caps I have simply
transferred the rolled clay onto a hard surface and used the cutter to give me
the shape I want. If you want to make caps for beads then you may as well use
beads as a drying form, in this case some rather nice large japer ones. I’ve used
a knitting needle to lightly press channel in between each petal tip for a
little interest, the shape can be finalised when they are dry.

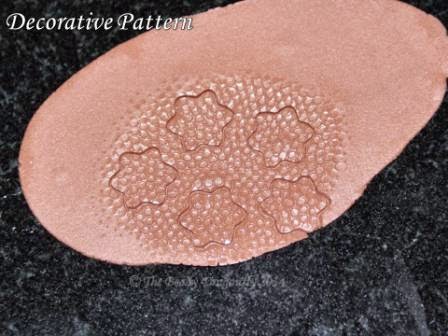
For the second set I’m going to
press a decorative plate into the surface of the clay, I’ve used quite a shallow
pattern as the pieces are so small so it will be interesting to see the effect
when it is fired. It can be quite a fiddly job lifting and piercing the caps
then easing them into shape on the bead so I like to cove the clay with a damp
piece of kitchen towel to stop it drying out while I work.
Next stop is tidying up the edges and sanding
the surfaces, it’s a lot easier to shape and sand clay so do as much of the
finishing as you can at this stage. Dried clay is brittle and will snap but
with a little care you can do some really fine detail work on it, use water and
clay slip to fill and smooth any cracks in the work. The really important thing now is to ensure
that the piece is completely dry; any moisture in the clay when firing will
nearly always end in disaster causing cracks and breakages. Pop the pieces onto
a clean piece of glass or mirror for a few minutes, if there is any misting on
the glass there is still moisture in the pieces. I have a warming plate that I
use because I need to dry a number of pieces as quickly as possible, that said,
it is on the lowest setting with the pieces on a rack about eight inches above
it. It’s the warm air circulating it not the direct heat that dries the piece
safely.

Well that’s about it for the
first part – next up Firing and Finishing.
Sunday 5 October 2014
Metal Clay – More Than Just Play-Doh
Strange title for a blog
you might think, well yes, probably, but ‘Play Doh’ was a term that I heard
applied to Metal Clay when I first encountered it a few years ago, mainly from
purists in jewellery industry who saw it as nothing more than a passing fad –
not worth taking the time to research. Well time has proven what a wonderful
and versatile product it is and I, for one, am hooked!
What is Metal Clay?
Well in simple terms it
is a combination of very fine particles of precious metals such as Silver, Gold
and Platinum mixed with an organic binder (in this case the clay) and
water. From a UK prospective the first major
developments in metal clay were undertaken by Mitsubishi (yes the car
manufacturers’) in the early 1990’s.
Their product was to become known as PMC, and was for a while was the
only avenue for this remarkable product in this country.

Metal clay was slow to
make a major impact on the jewellery trade here in the UK with people not
understanding its potential or finding it too fiddly and time consuming to be
profitable. The price in the early days was prohibitive; demand for the product
wasn’t high, with very few suppliers in the UK and little competition to bring
prices down. With the American jewellery makers’ leading the way the product
has become more popular and you can now work in: Platinum, Gold, Silver, Copper, Bronze and
Steel.
So how does it work?
This is not a lesson on
how to use metal clay in fine detail, merely an introduction to what you can
achieve with this most remarkable of mediums.
Firstly you need to
remember that while the finished item is precious metal the main component during
construction is clay, any restriction you have initially will be dictated by
that medium first and foremost, so forget you are a metal smith and become a
potter.
You can buy the clay in lump
form of various weights, in a syringe or as a very fine sheet and you can use
one or all of these to make your piece.
Because clay is the dominant material you can manipulate it in a variety
of ways. It can be rolled, moulded and stamped, you can add texture to all or
parts of it and it can be built up in layers to produce interesting effects.
The picture below shows a clasp that I made with one side fired and ready for
polishing and the other side still in the ‘dry’ state waiting for final sanding
and finishing before being assembled prior to firing.

The
Platinum, Gold and Silver versions can be fired with a hand torch in what is a
relatively quick process if you don’t have a kiln; however, until recently the
copper and bronze versions required a very long 2 stage process involving activated
charcoal. They have now introduced quick
fire versions in both mediums which has made them accessible to a wider range
of crafts people.
Metal
clays are never going to replace the traditional metalsmiths’ techniques and
nor should they. My hope is that they
will become accepted as another way of stimulating people’s imagination into
different areas and ultimately giving us one more avenue to be creative
with. Just to whet your appetite to the
possibilities - this is what I produced from my first experiments with copper
clay, finished and ready to be fired - they sold within a week!

Wednesday 24 September 2014
A Technological Terror – a.k.a. Taking The First Steps Into The World Of E-Commerce
WEBSITES.....
..... they’re everywhere these days!
Retail outlets have long been on
the website bandwagon but they are no longer alone!
Celebrities have them; money
spent on their own personal version of ‘Hello’ or ‘OK’ magazine!!!! Network channels use them to promote your
favourite channels and programmes in an effort to increase viewing figures;
even sporting personalities now have a website presence!
Like it or not online retail is
BIG business and the big players spend a lot of money getting noticed!
So here I am starting out in the
in the big bad world of enterprise and trying to stake my claim as a business
owner – the thought of setting up and running a website a tad frightening.
Funnily enough that’s probably a
good thing.....
Okay first things first; I am not a
website expert, never have been and probably never will be – all that technical
stuff goes in one ear and out the other. Still I do like learning, have never
been very good at being told I can’t do something and I like a challenge, so
let’s talk websites.....
..... or not; well not yet
anyway!
Before I could even start building
a website I needed to decide how I wanted to brand my products, I figured the web
page would lead the way for all the other areas of marketing. Simple enough; or
so I thought, as I sat down with paper, pen and a large pot of coffee ready to do
some serious research into this wonderful branding that I was going to devise. I
made lists, lots and lots of lists – what I liked, what I didn't like, who my
target audience was, who my competitors were – it just goes on. The lists were
refined, reduced and starting to make sense, time for the simple process of
registering a domain name. Simple – no, no, no you silly woman what are you thinking
of? Well just sticking ‘www’ on the front and ‘.co.uk’ on the back of my
business name actually, surely that’s all you need to do …. Isn't it!

So off I went to a domain name
expert and typed my proposed business name in only to find that it was already
take, as was my second and third ideas. After a fair bit of head scratching I
finally came up with a variation that was available, my excitement knew no
bounds FINALLY I was getting somewhere. A brief look at Facebook and Twitter
confirmed that no one on there was using the name either so in a rush of
emotion I registered my name then went to lie down in a darkened room.

After all that things can only
get easier but I’ll leave that for another day!
Tuesday 16 September 2014
Introducing A Self Made Somebody
The first thing we
should establish is the word eccentric (or crazy if you prefer) is often
applied to me, so if you are expecting sensible, serious or profound you’re
probably following the wrong blog page. I
should also mention that I can talk – a lot – hind leg off a donkey and all
that as they say; so you have been warned!

I’ve been with my
OH for twenty years although we’ve only been married for a dozen or so. I live
on the outskirts of Nottingham, close enough to the centre if I need to be but
far enough away to be on the edge of the countryside which I escape to as often
as possible. I have a wide range of interests, including a fondness for good
food and red wine and a very eclectic taste in music. Any spare time I do have
is usually spent doing running repairs to the house or trying to tame the
wilderness in my back garden.
Initially my career
was spent in administration for both private and public organisations,
something I enjoyed doing but stopped being challenging after a while. Anyone
who has worked in an office knows it’s not a good career choice if you get
bored easily; it takes a real skill to get enthusiastic about photocopying the
same page for twenty different people. I took a year out and went back to
college to study horticulture for no other reason than I love gardening (and boy
is there more to that than meets the eye) but ultimately that doesn’t pay the
bills so it was back to work for me. Deciding I wanted something completely different I
went to work for Tesco’s, working my way up from checkout operator, through
customer services to merchandising and stock control. It was an incredible
experience not just in terms of learning retail skill but life skills as well.
I can guarantee with the mentioning of good old Tesco at least some people will
think that it’s an easy job, I mean what’s hard about putting cans of beans on
a shelf? Let me tell you at times it’s hell on wheels – imagine running a long
distance race where you are working flat out to stay ahead to the competitor
whose breathing down your neck and desperately wondering where the finishing
line is – that is the reality of retail nothing stays the same for more than a
few days!
I loved every minute of it.
I loved every minute of it.
Eventually though I
decided what I really wanted to do was work for myself – so here we are running
my small business from the spare bedroom and writing blogs to entertain the
people who are kind enough to visit.

Some of these musings
will be about the creative side of things; with the occasional jewellery book
review thrown in as well, some will be about my home life. I hope you enjoy
reading them – feel free to leave comments – good, bad or indifferent – I’m
happy to see them all.
Oh and I better not forget to mention my four cats – the real rulers in our house!

Subscribe to:
Posts (Atom)